
 One of the most popular articles of all time on this blog has been an article on how to get CrashPlan running on a headless server. Crashplan changed some things in how this needs to be done, so my old article was no longer correct. I went through the process and updated this blog, so as of today, this process is working correctly.
Many of you run a NAS of some sort at home. Crashplan is a great choice to backup these devices, but its not terribly intuitive to do so, and it’s technically not supported to use Crashplan in this way.
You’ve probably noticed that even if you can get the application to install on your NAS, there isn’t any obvious way to configure it. Here is a step by step guide to install Crashplan on a NAS or headless Linux based server, and then get it all setup for your liking. The instructions will be very similar for most Linux / NAS variations. I just went through this process on my home NAS, which runs OpenMediaVault. I’m going to assume you are using a Windows client to manage your remote headless device.
First, connect to your NAS / Remote / Headless machine. You’ll probably want to do this via SSH. If you are on Windows, I recommend using putty.
Second, Download Crashplan onto your NAS from inside your SSH session, by typing these commands into your session. Note the location provided below will get you the latest version for Linux as of 12/19/2016. You may want to head to their website to find what the latest version is and adjust accordingly:
- cd /
- mkdir temp
- cd /temp
- wget http://download.code42.com/installs/linux/install/CrashPlan/CrashPlan_4.8.0_Linux.tgz
- tar -zxvf CrashPlan_4.8.0_Linux.tgz
- cd crashplan-install
- ./install.sh
This will run an install script that will ask you a bunch of questions, such as install locations. You can generally accept the defaults on ALL of them. At this point, the CrashPlan engine is running on your NAS, but there are no backup selections. There also isn’t an account configured, or any other settings in place. Now we need to get this thing setup properly.
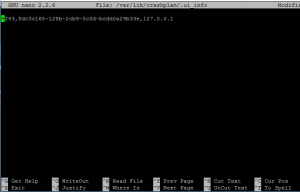
Third, view the “Authentication Token” from your remote machine, by running this command in your putty session:
- nano /var/lib/crashplan/.ui_info
- This will show a string that looks something like this from the screenshot below: 4243,8dc3c165-128b-2cb9-3c3d-bcdd0a29b33e,127.0.0.1
- Everything between the commas is the authentication token. In this example from the screenshot below, that would be: 8dc3c165-128b-2cb9-3c3d-bcdd0a29b33e
- Copy this string to your clipboard. I recommend pasting it into a text file for later use.
- Hit CTRL+X to exit nano without saving
Fourth, download and install the CrashPlan client for windows on your local machine. I will assume you know how to do this. Don’t bother filling out the account information. As soon as it installs, just close it.
Fifth, on your LOCAL windows machine (not your headless / remote / Linux) machine, we need to make some changes to the local config, as follows:
- Open the .ui_info file. On your Windows box, it should be located here: C:\ProgramData\CrashPlan\.ui_info Use notepad to open this file, and you’ll see a very similar string as you saw on your Linux box.
- Paste in the authentication token from your Linux box over the Windows one.
- Change the “4243” at the very beginning of the string to say “4200”. This is changing the port that Crashplan will use to connect.
- At this point, your text file on your Windows box should look identical to the one from your Linux box, except for the “4200” in the place of “4243”
- Save this. Oops, Windows won’t let you save it with that weird filename? No problem. Save it as .ui_info.txt. Then, open a command prompt and type this command: rename C:\ProgramData\CrashPlan\.ui_info.txt .ui_info
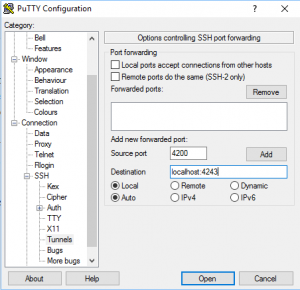
Sixth, on your LOCAL Windows machine, we need to setup an SSH tunnel. Its not as hard as it sounds, follow these steps:
- Open Putty. Browse in the tree at left to open Connection, then SSH, and click on Tunnels, as shown in the image below.
- Enter “4200” for the source port. Enter “Localhost:4243” for the destination, as shown below.
- Click the “Add” button. Then browse back up to your session and open your SSH connection to your NAS again. Login.
- At this point, you have an SSH tunnel forwarding traffic.
Seventh, Open the CrashPlan app on your windows machine. If it takes a long time, and then says it was unable to connect, go back through these steps and make sure everything is square.
Once it connects, it will ask you if you are using an existing account, or creating a new one, just like it would with a local install. Remember, even though you are using the client on your local machine, all these changes are actually affecting the service on your Remote / Headless / Linux / NAS device.
For more information, check out the CrashPlan support article on this topic here.
Hi there, could you please update this article and if possible include it into a YouTube video.